macOS Sonoma makes great changes in the UI (user interface) and UX (user experience) for how screensavers are managed.
Please start out by reading about this from the user’s perspective: Understanding the macOS Sonoma Screensaver UI/UX
This topic is about managing these settings from an IT perspective.
Major changes:
- there is a second plist which controls screensaver AND wallpaper behavior
- the plist is in a new location
- the plist is very complicated, as it contains numerous modes and sub-modes.
iScreensaver 6.8.6 has been updated to deal with this new plist format.
Upon installation (from an iScreensaver installer built using iScreensaver Designer), the settings are reverted to the most simple mode possible:
- the installed screensaver is set to play on all screens (“Show on all Spaces” mode)
- if Linked wallpaper/screensaver mode was used, it is turned off.
- Wallpaper is kept as is (Exception: if the user had per-screen wallpaper, the first screen’s wallpaper is used on all screens)
Easy Mode
If you want to keep things simple, you can simply run the screensaver installer on a test system, install, and the plist will be edited for you. After installation, you should be able to copy this plist and use it as-is in whatever device management system you are using (such as Jamf, etc.)
The plist should be usable on other systems, since it has been rewritten to use a generic mode which does not reference any machine-specific IDs.
Managing the Sonoma screensaver plist
If you want to dig into the technical details, please read on…
Location: The new plist is located at
~/Library/Application Support/com.apple.wallpaper/Store/Index.plist
Making Changes: if you change the plist, nothing will happen. This is because the data that generates the plist is actually held in-memory. Through some experimentation, it has been determined that the WallpaperAgent process is managing the data. Fortunately, you can edit the plist, as long as you restart the process immediately afterwards:
killall WallpaperAgent
Note: this will cause the wallpaper (desktop background) image to briefly flash to black.
Sonoma Screensaver plist Format
Unfortunately, due to all the new modes and sub-modes, the plist format is very complex. For this reason, it’s generally much easier to reset it to a simple format, in which the same screensaver and wallpaper image are used on each screen.
Sonoma Screensaver plist: Easy Mode
In the simplest mode, the same screensaver and wallpaper are used on all screens. In this mode, the Plist has this outline.
Note: in these images, the details have been collapsed to show the overall structure more clearly
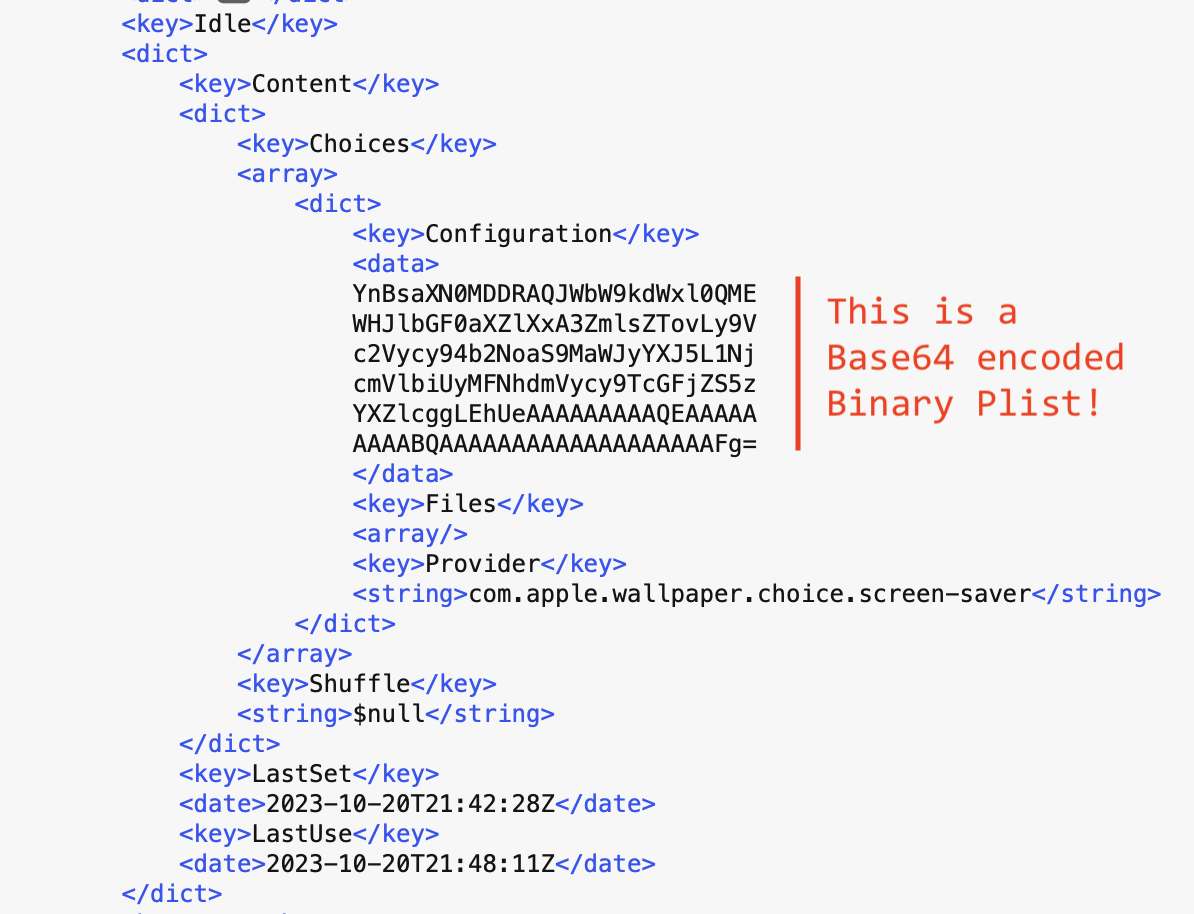
Screensaver Settings: the <idle> section
In the simple mode, the Idle section has this format:
Unfortuantely, the most important data (the path to the currently selected screensaver) is further hidden. The <Configuration> data section is a Base64-encoded binary plist.
If you decode the base64 data and convert from binary plist back to regular plist, the data looks like this:
this is for the default ‘Install for Me’ location
this is the result of doing an ‘Install for All Users’ installation.
Note: if you intend to use the entire plist as-is after installing your iScreensaver, you will want to use the ‘For All Users’ install, which installs in a location /Library/Screen Savers/ which will have the same file::/ URL path for all users on all machines.
On macOS, to do a For All Users installation:
- run the screensaver installer that was built by iScreensaver Designer.
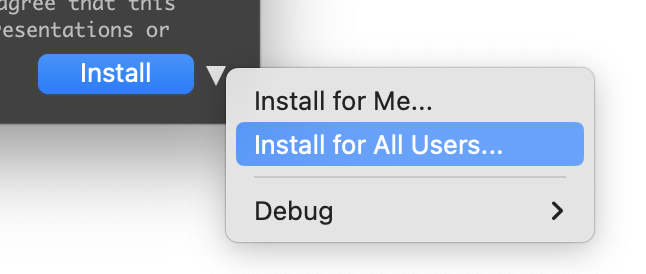
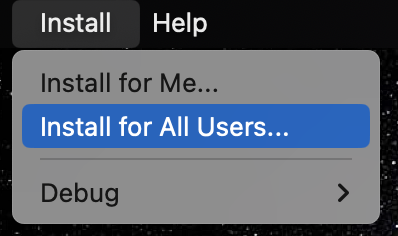
- Then choose Install / For All users one of two ways:
- From the Install button popup-menu:
- Or from the Install menubar:
This will install the screensaver in /Library/Screen Savers/ and set the Plists appropriately so they can be used on any mac running macOS Sonoma.
Initial tests using the beta versions of macOS Sequoia suggest that this technique works for Sequoia as well.